June 07, 2022
How to Calculate Backpressure for a Pond Aeration System
Calculating or measuring the backpressure is important when planning and maintaining and aeration system.

Backpressure and air flow have an inverse relationship – the higher the pressure, the less the air flow. In reverse, the lower the pressure, the higher the air flow. The amount of airflow entering the pond is important to understand when choosing a pump, diffuser, and tubing. To estimate the amount of air flow we need to first calculate the total system pressure.
Calculating System Backpressure:
- Calculate water depth backpressure: Every 2.31 ft. of water depth is = 1 PSI. Example: the water pressure for an 8’ deep pond is: 8’/2.31 = 3.46 PSI
- Identify diffuser backpressure: A popular suggestion on the internet is a fine bubble stone diffuser, which can add as much as 1.5 PSI to the system and can easily plug. HIBLOW recommends a medium bubble diffuser which typically puts less than 0.25 PSI on the system. Regardless of which diffuser size/ type you choose, it is important to be able to estimate the amount of pressure the diffuser adds to your system. Also note the amount of air flow recommended for the diffuser. If below the minimum flow recommended, the air may not be strong enough to open the pores and “self-clean”. This information will be important at the end of this exercise.For more in-depth information on diffusers, check out our article: https://www.hiblow-usa.com/2021/05/03/pond-aeration-system-diffuser-options/
- Calculate friction loss: Air flowing through the tubing will create friction loss (added pressure). The air pump size, length of the tubing, number of lines, elbows, and diameter of the tubing will all factor into the calculation.First, we need to figure out the diameter of tubing that is best for your set-up. As a rule of thumb, for any run within 50’ a 3/8” tube is likely ok. From 50’-100’ we typically suggest ½” diameter tubing. Anything beyond 100’ we suggest ¾’ diameter tubing. However, that is just a rule of thumb and there are exceptions based on the amount of air flow from the pump (pump size) and the back pressure.
Steps to calculate friction loss:
Example 1: We have a ½ acre circular pond at 8’ depth. The pump will be 100’ from the diffuser. We looked at the HIBLOW pump sizing chart and determined that the HP-80 with 1 medium bubble diffuser is the best solution.
Step 1: Add the water pressure and the diffuser pressure together. 8’ deep/ 2.31 = 3.46 PSI. Our medium bubble diffuser adds 0.25 PSI. Total: 3.71 PSI
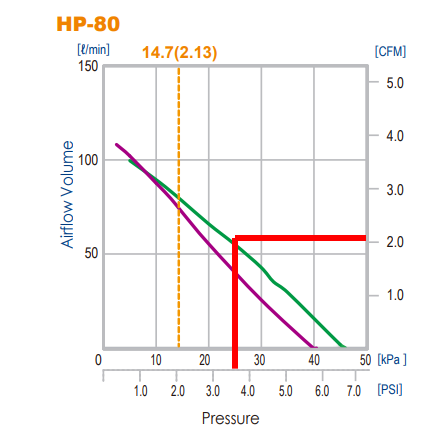
Step 2: Determine the airflow of the HP-80 at 3.71 PSI. First, click on the HP-80 in the HIBLOW Model column on our website. Under product details, click “download specifications”. Looking at the HP-80 graph (pictured below): the air flow is right around 2 CFM or 57 LPM at 3.71 PSI. The red line shows how the graph is interpreted.

Step 3: Reference the HIBLOW USA Friction Loss Chart. The chart specifies PSI per 100’ of tubing. The friction loss at 2 CFM or 57 LPM is about .45 PSI for 3/8” diameter tubing or 0.14 PSI for ½” tubing. In this case we would probably suggest going with the ½” tubing to reduce the pressure and increase the airflow.
*The chart is for schedule 40 PVC tubing. Use the nominal diameter sizes for PVC. Reference in the inside diameter numbers for weighted tubing.
**If you were running the tubing 200’ for example, you would need to multiply the PSI by 2 to get the total friction loss. Friction loss at 200’ would be 0.9 PSI if using 3/8” diameter tubing and 0.28 PSI if using ½”.
Step 4: Calculate the Total System Pressure: Water pressure + diffuser pressure + friction loss.
For this example, our total system pressure using ½ diameter tubing is 3.85 PSI (3.46 PSI+ 0.25 PSI+ 0.14 PSI). Looking back at the HIBLOW flow chart/ pressure chart (above), the total airflow entering the pond will be around 50-55 LPM or 2 CFM. At this point it is important to make sure the airflow fits within the diffuser recommendation range.
Example 2: Adding a second diffuser. We will keep all other variables the same. We have a ½ acre kidney shaped pond at 8’ depth. Since it is kidney shaped, it probably makes sense to add a second diffuser. The pump will be 100’ from each diffuser. The tube will run 50’ from the pump to the pond shoreline and then 50’ from the manifold or Y fitting to each diffuser. We selected the HP-80 with (2) medium bubble diffusers.
Adding a second diffuser changes some variables, particularly the friction loss. Since you are splitting the line, if the depth is the same, 50% of the air flow will go to each diffuser. We do recommend installing ball valves at the split which helps even out the flow if the diffusers are at different depths.
Step 1: Add the water pressure and the diffuser pressure together. 3.46 PSI + 0.25 PSI. Total: 3.71 PSI. Adding a second diffuser of the same kind does not increase the backpressure
Step 2: Since the backpressure of the diffusers and water pressure did not change, the flow remains at ~2 CFM or 57 LPM
Step 3. Since we are splitting the lines at the shoreline, we have multiple calculations:
- Calculate the friction loss for the full flow of 57 LPM for 50’ to the shoreline. Based on the chart, we can divide the 100’ numbers by two to estimate 50’. Using 3/8” diameter tubing, our friction loss will be about 0.23 PSI. Using ½” our friction loss will be 0.07 PSI.
- Calculate the friction loss of each tube after the split. Total flow is 57 LPM, so in theory 28.5 LPM or ~1 CFM will flow to each diffuser. This is accurate if both diffusers are at the same depth. 3/8” diameter tubing friction loss: 0.12 PSI for each – total of 0.24 PSI. ½” diameter tubing friction loss: 0.02 PSI – total of 0.04 PSI.
- Add 1 and 2 together to get the total friction loss: 3/8” diameter tubing: 0.47 PSI. Total friction loss for ½” diameter tubing: 0.11 PSI
Step 4: Again, we would recommend using ½” tubing from the pump to the shoreline and from the shoreline to each diffuser. Total pressure would be slightly less than only running 1 diffuser at 3.82 PSI.
It is important to keep in mind that each diffuser is receiving around 27 LPM, so it is important the flow is within your diffuser’s recommendations. If it is not, you would maybe consider bumping up to the HP-100LL to get some more air flow to run each diffuser. If bumping up to a bigger model, it would be advisable to run through the calculations again.
Once your system is set-up, we suggest investing in a 0-10 PSI pressure gauge. You can install a “T” just outside of the pump’s port and check it from time to time to make sure the pressure stays consistent. If there is a significant loss in pressure or increase in pressure, you can identify the cause and fix the issue before it is too late.
Author: Mike Miner
More Pond Aeration Content
- What Size Air Pump Should I Buy?
- DIY Pond Aeration
- How to Calculate Backpressure
- What Type of Diffuser Should I Buy for My Pond?
- How Water Depth, Pipe Size and Diffuser Type Affect Longevity
- DIY Solar Pond
- For all HIBLOW pond aeration content click here
Choose HIBLOW for Your Pond Aerator
We’ve manufactured air pumps for the pond and aquatic industries for over 30 years. We know that reliability, energy efficiency, and low sound levels are all extremely important for your aquatic systems. Whether you’re aerating tanks on fish transport vehicles, operating a commercial fish farm, or just keeping your backyard pond in a healthy condition—you can depend on our HP and XP pond aerators for your application.
Contact us today to find the best pump for your application!